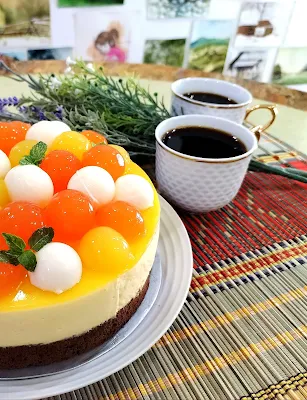
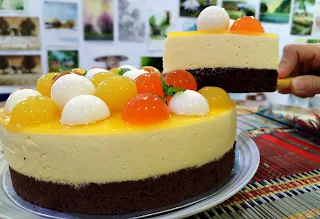
Mango Mousse cake with Jelly fruit balls(芒果慕斯蛋糕)
Are you craving a real mango treat?
This Mango Mousse Cake is a decadent cake made of a moist sponge cake topped
with a creamy mango mousse, then finished with a sweet mango mirror graze
topping.
This mango mousse cake comes with three
layers. The layers consist of a base of sponge cake and the mango mousse
filling mixed with fresh mango puree and whipped cream. To improve the
structure of the cake, I added gelatin to the mousse filling. The third layer
of the cake was topped with mango mirror glaze and was surprisingly amazing.
This is a “safer cake” especially for those who do not have a good skill to frost the cake. You can decorate the cake anyway you like. I made jelly fruit balls to garnish this mousse cake. I would like to point out the fruit jelly balls, which were inspired from the jelly moon cake recipe. I made the jelly balls in 3 different flavour which are, mango, papaya, and yogurt. You may pick any fruit you prefer or skip this stage if you do not want to make this cake fancy.
I baked my sponge cake in an 8”x3”
round aluminum alloy cake tin with loose base which easy to release the cake. I
changed to using an adjustable stainless steel round mousse cake ring.
The cake was topped with mango mirror
graze and was surprisingly amazing. The smooth and silky texture offers perfect
coverage; their pure, concentrated flavours and aromas bring this dessert to
the next level.
How to use a mousse cake ring?
It is bottomless, do I need to use aluminum
foil or plastic wrap to cover the bottom? You may cover the bottom to avoid any
leakage. The most important step when making the mousse filling is to keep it
in freezer for 10 to 15 minutes to thicken the filling.
Mousse cake ring do not have any
bottom, so you need to put a dish at the bottom of the mold, preferably a
flat-bottomed dish, or a cake board which is convenient to put in the
refrigerator. The general recipe is either
to make biscuit crumbs or a cake as the base. I am using sponge cake for this
recipe and then pour in the mousse filling, put it in the refrigerator until
the mousse filling solidifies.
How to Remove the Cake from the Mold
Blow around the edge of the ring with
a hairdryer set on medium, gently pulled up the ring with your hands. If you
forcefully drag the ring upward, it will result in an unfinished edge. If the
sides of the cake have softened after unmolding, chill it for 15-20 minutes
before proceeding.
Can I use other baking tin to make mousse cake?
Absolutely yes. You don't need to buy a mousse cake ring on purpose for making this mousse cake. You can use an 8" round aluminium alloy cake tin with loose base or a 8" springform pan for making mousse cake
INGREDIENTS
Chocolate sponge cake
(A) 4
egg yolks
45ml
milk
40g
melted butter
(B) 4
egg whites
100g
sugar
(C) 100g
plain flour
10g
cocoa powder
½
tsp baking powder
METHOD
1. Whisk the egg yolks in a bowl,
then add in the milk and melted butter, whisk all the ingredients in the bowl.
2. In a separate clean bowl, beat the
egg whites until foamy, gradually add in the sugar three times, beat until
stiff peak form.
3. Sift the flour mixture (C) to the
meringue (step 2), gently but quickly fold flour mixture to the meringue with
rubber spatula. Add in the egg yolks mixture (step 1), fold until all is well
combined.
4.
Pour the batter into the 8” round baking pan lined with baking paper, smoothing the top and
baked at the preheated oven 180°C for 35 – 40 minutes.
Jelly fruit balls
(A)
100g mango puree / papaya puree/
1 tsp agar-agar powder
½ tsp jelly powder
50 g sugar
400 ml water
(B)
Yogurt jelly balls
200ml yogurt
1 tsp agar-agar powder
½ tsp jelly powder
50g sugar
METHOD
In a saucepan, combine all the
ingredients and bring to a boil. Pour the mixture into the round ice cube
plastic tray and refrigerate for 1 hour to solidify. Demold for decoration.
Mango mousse filling
(A) 350g
mango puree
60g
sugar
(B) 2
tbsp gelatine powder
6
tbsp cold water
(C) 350ml
whipping cream
35g
sugar
Mango Mirror Graze
100g mango puree
25g sugar
2 tsp gelatine powder
100ml cold water
METHOD
1. Combine the gelatine powder and cold water in a bowl, whisking it well. Set aside for 5 minutes or until spongy. Place the bowl in a heatproof bowl or plate of hot water and stir until the gelatine dissolves. Let it cool slightly, before adding to the filling mixture.
2. In a heatproof bowl, combine the mango puree and water, placed over a saucepan of simmering water, stir until sugar completely melted. Remove from heat and immediately pour through a fine strainer to remove any lumps. Let it cool to room temperature.
3. Pour the gelatine mixture into
mango mixture, stir well. Cool the
mixture with cold water to thicken the mixture.
4. Combine the whipped cream and
sugar in a mixing bowl, beat the cream with hand mixer until 60% whipped, double
in volume but still in liquid form.
5. Pour the cool mango mixture from
step (3) into the whipped cream, stir the mixture well with a spatula until
incorporated. Keep in a freezer for 15 minutes to thicken the mixture. (This step
will avoid the filling leak out from the
mousse cake ring).
6. Adjust the mousse cake ring to 8”
which fits the sponge cake. Place it on a plate or a cake board which is bigger
than 8”, put the ready sponge cake inside the ring as a base. (Make sure to adjust
the ring which is tight and fits to the cake).
7. Pour in the chilled mango mousse filling, smooth the top and refrigerate the entire cake for at least four hours or overnight.
8. To make the mango mirror graze –
combine the gelatine powder, sugar, and cold water in a bowl. Mix it well and
place the bowl in a heatproof bowl or plate of hot water and stir until the
gelatine dissolves. Pour in the mango puree and stir well, then pour it into
the cake that has been refrigerated for 4 hours and keep it in the refrigerator
again for another 1 hour. Enjoy!!
9. If you want to make the cake fancy
as a special occasion, simply decorate it with fruit jelly balls.


Comments
Post a Comment